
A Holiday Turkey Tray is a whole Turkey broken down and cooked, while the bones are used to make the Stock. You get nice crispy skin, perfectly seasoned, juicy meat with thinly sliced Turkey breast and stripped off the bone dark meat, all laid out in a presentation tray. It’s just the best way to not only prepare your Holiday Turkey. But to present it as well for everyone to help themselves, loading their plates up to make their custom Holiday Turkey Meal.
I was never really big on a carved Turkey. Always choosing to break the Turkey down after cooking, so that everyone could assemble their plates quickly with choices of side dishes. While I use to cook the Turkey whole. I definately subscribe to the superior technique of Turkey already broken down and dry aged overnight before being cooked. That is just something else.
Although this is a two-day Preparation & Cook. Most of the time is just waiting or better yet preparing the side dishes and treats too. You just break the Turkey down and season to refrigerate overnight. You use the Carcass to make the Turkey Stock to refrigerate overnight as well. That’s it for preparation, along with any cold sides you may want to make. The next day, you just cook. Even the cook time is much faster than cooking a whole Turkey. Furthermore, since the Stock was made the day before and refrigerated. It yeilds the fat settled at the top that can be used to make a more flavorful Turkey Gravy.
Why a Holiday Turkey Tray is better
There are quite a few reason on why a Holiday Turkey Tray is just all around better and more efficient than a whole Turkey.
Space
Everything can fit on a large single sheet with a rack in the fridge and transfers to the oven. This frees up alot of space. Not only by minimizing the space in the fridge, especially with all the cold side dishes being prepared as well. But in the oven, freeing it up to cook or reheat warm dishes.
Seasoning
The Turkey Seasoning can penetrate much more. Resulting in tastier meat because of more surface area covered by the seasoning. The Turkey meat really does come out more flavorful.
Time
The Turkey only takes about 1 1/2 hour – 2 hours, depending on the Turkey size. Freeing up time, for all the sides to be prepared.
Percision
Breast & Thighs can be cooked to ideal temperatures separately. Breast should register 157 F, and Thighs should register at least 175 F or higher. At these temps the Turkey is at its most optimal juiciness and flavor.
The Browning can be controled more too. If it is browning too much, cover in tin foil. If not enough, raise it higher in the rack poisition and brush again with butter or place on broil in a lower rack position for a few minutes.
Effective
You get far better crisping of the skin. The Turkey Drippings are drizzled over the meat in the Tray and is very effective at adding extra flavor and keeping it moist. Even if you have to plate and refrigerate to reheat later before serving.
It also caters with a twelve (12) lb Turkey to either a small crowd of eight (8+) with one tray or to a large crowd of sixteen (16+) by doubling up with two (2) trays and all of the Turkey can be cooked up at the same time. Just position the oven rack one notch above middle position and the other oven rack in middle position. Place both trays of Turkey in and switch spots 2-3 times during cooking for even browning. Rotate the pan around when switching, so the front of the tray faces the back of the oven.
Synchronicity
The whole process is synchronized and utilizes the Turkey to the fullest potential.
You make the stock the same day you season the Turkey and refrigerate both overnight. The next day, the Turkey is ready to be cooked and your stock will offer up the Fat that settles at the top to make Gravy. Allowing you to serve Turkey & Gravy with minimal work at the same time, Hot & Fresh. Any side dishes that need to be reheated can go into the oven along with the Turkey towards the end or afterwards so everything is served hot.
When the Chicken Breast come out of the oven to rest, you can start the Gravy. By the time your Chicken Quarters are ready to come out and rest, you can start slicing the Breast. After slicing the Breast you can separate some of the meat in the Thigh and Legs with forks to open it up and cool down faster and start stripping the meat of the bone. Any Pan Drippings can be drizzled over the meat.
Rendered Turkey Fat
The rendered Turkey Fat (Turkey Schmaltz) is what you want for your Gravy and offers up better flavor. Since the Turkey stock is made the day before, it gives plenty of time for the rendered Turkey Fat to settle at the top to be scooped off and used to make Gravy. Just be sure to chop the Skin into small pieces so that it more readily dissolves.
Another technique is to just set aside all of the skin and pieces of Fat to render in a pan over medium low heat until crisp and brown. Scoop out the crackling and salt it for a nice snack, which is good for your skin, or discard and set aside the rendered fat to cool down. This method produces a rendered fat that has a Fried Chicken, or in this case Fried Turkey flavor. It’s really good in Gravy.
Serving
With Carving a Turkey everyone is waiting around to get their portion. With a Holiday Turkey Tray, everyone just starts assembling their plate pretty quickly with their choice of Meat, sliced Breast, Wing Meat or Dark Meat. While others are plating with their choice of sides. Everyone is busy building their plate.
There is also a choice of having Turkey Meat smothered in Gravy, or picking out the choice meats for a Hot Turkey Sandwich. You can even serve up Biscuits, so that your guest can place Turkey meat over the Biscuit with Gravy.
How to Thaw Turkey
Thaw Turkey in the fridge for a long and gradual thaw. A Cold Water thaw can be used to thaw Turkey at a faster rate. I often use this method for this Holiday Turkey Tray so that I can get it broken down, seasoned and refrigerated overnight.
When completely thawed and ready to cook the Turkey. Remove it from the Fridge 1 hour to allow it to come to room temperature prior to cooking.
Refrigerator Thawing Turkey
Thaw Frozen Turkey in the fridge in original packaging, breast side up, on a tray. Allow a full 24 hours for every 4-5 lbs of Turkey. Remove the Turkey from the Fridge 1 hour to rest on the counter to come to room temp before you plan on cooking the turkey. A 12 lb Turkey will take about 3 days to thaw.
Cold Water Thawing Turkey
Place Turkey in original packaging, Breast side down, in the sink and completely cover with water. If the Turkey can not be completely covered, turn it over every 30 minutes. Change the water every 30 minutes. It takes about 30 minutes per 1 lb of Turkey. A 12 lb Turkey will take about 6 hours to thaw.
How to break down a Turkey
Breaking down a Turkey is much like breaking down a Chicken. It’s just much larger pieces and the Breast you leave intact.
Wings
Pull one of the Wings forward and slice between the Wing joint and Breast. If you hit Bone, reposition the knife. Pull the Wing out a bit further so you can cut where the joint meets the socket. Repeat with the second Wing. Chop the Tips off to include in the Stock pot.
Quarters
Pull the Legs by stretching them out. Press the Skin into the Leg crease to ensure Skin covers the Breast. Cut alongside the Leg to slice through the Skin. Repeat with the second Turkey Leg.
Bend each Leg backwards until the joint pops out of socket. Cut in between the bone joint and the backbone, to release the Turkey Quarters from the body. Slice in between the joint to separate the Leg from the Thigh.
Breasts
Place turkey breast-side down and cut the wish bone out. Flip the Breast up right and cut along both sides of the breastbone, then make a bunch of small slits against the Breast Bone and pull Breast meat away from the Keel/Breastbone.
On the underside of the Turkey Breast is where the Turkey Tenderoin is located. This can be sliced away from the Breast and used separately to Sear or included with the Turkey Breasts. They make for excellent Turkey Nuggets too.
Carcass
Throw what remains of the Turkey into a Stock pot to make Turkey Stock. Chop skin into small pieces so that it yeilds up the fat more readily.
You can also Roast everything at 400 F for about 45 minutes before placing into the Stock pot and filling with Water to make the stock. Roasting the carcass and neck bone with all the trimmings will offer up a nice Roasted flavor. You can inlcude the Onions, Carrots & Celery too. Then empty everything into the Stock pot to cover with water. Optionally break down large pieces into smaller pieces.
Turkey Seasoning
The Turkey Seasoning is your Salt & Pepper blend with a dominant Herb or choice of Herbs, like a Poultry Seasoning and some Chicken Powder should you want. Savory is commonly used for seasoning Turkey and pairs exceptionally well for Poultry in general. This can be exchanged with others Herbs like Sage, Thyme or the use of all three plus some. Entirely up to you, but the Salt & Pepper blend does a nice job at seasoning for a Turkey Dinner.
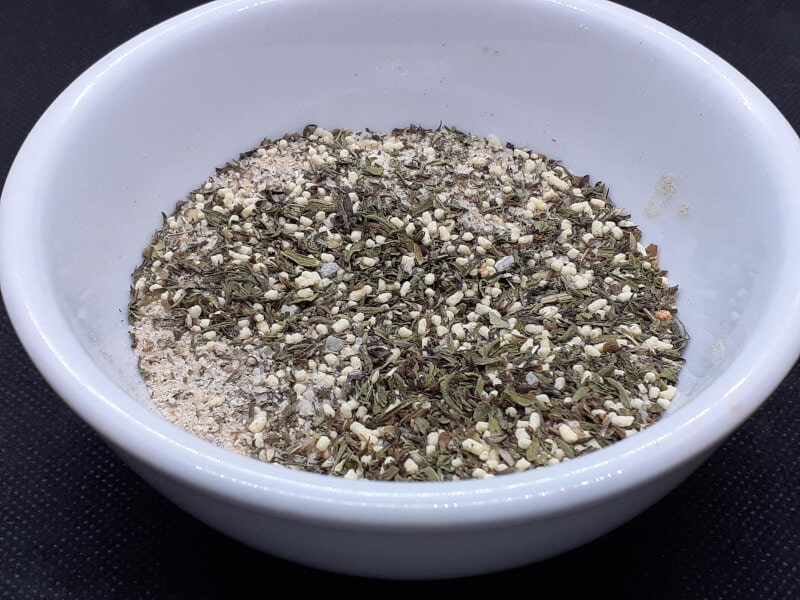
Turkey Seasoning
- 1 Tbl Sea Salt & Savory
- Optionally with 1 Tbl Chicken Powder or 1 pack of Magic Sarap
- 1 tsp Black Pepper
- 1/2 tsp White Pepper

Chicken Powder
Either 1 Tbl Chicken Broth Powder or 1 pack of Magic Sarap can be included with the Turkey Seasoning.
Dry Aging Turkey
Dry aging the Turkey refers to seasoning the Turkey and refrigerating it overnight or longer, up to three (3) Days, so that the seasoning can penetrate and the exterior dries out a bit. Which also assist in a better crisping of the skin. The Salt will work to draw moisture out and create an exterior that will crisp up very nicely in the oven. Especially with melted Butter brushed on to assist in browning.
How to Dry Age Turkey
Place Turkey pieces on a Rack on top of a Large Shallow Pan, season with the Turkey Seasoning and refrigerate uncovered overnight.
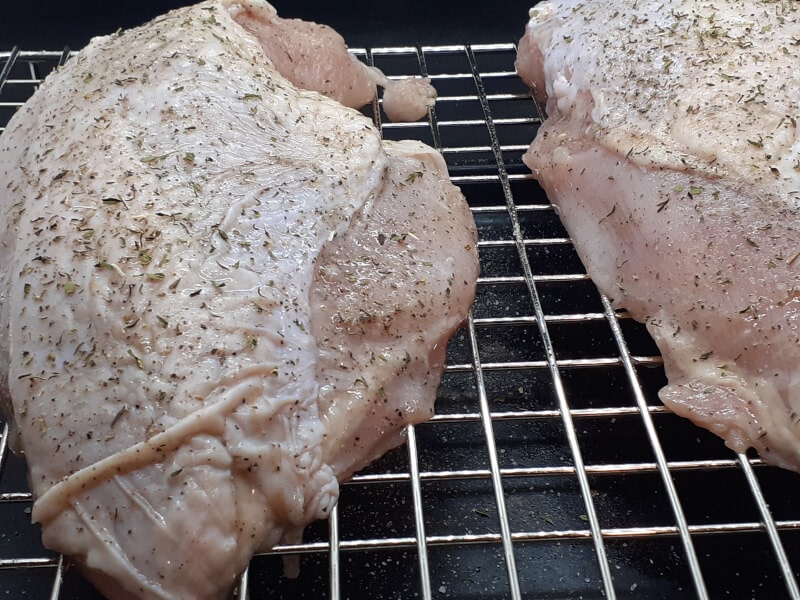
Seasoned Turkey Breast
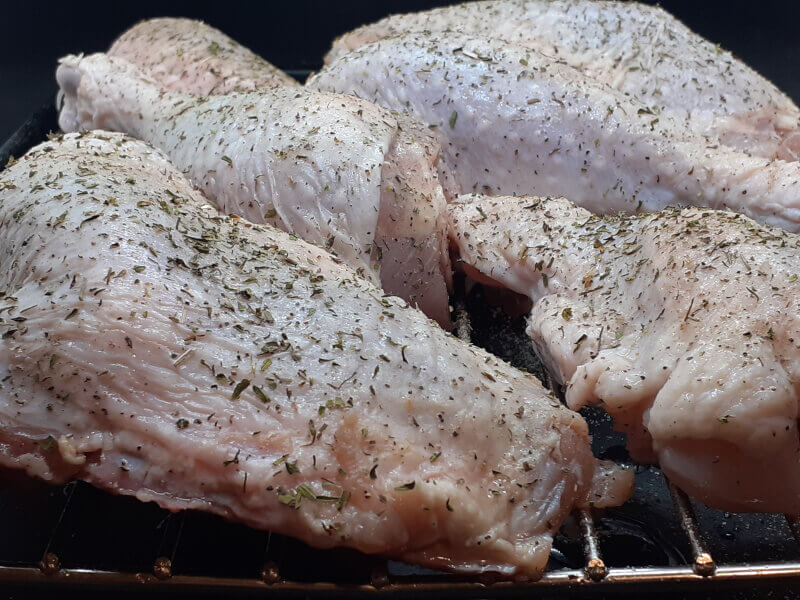
Seasoned Turkey Thighs
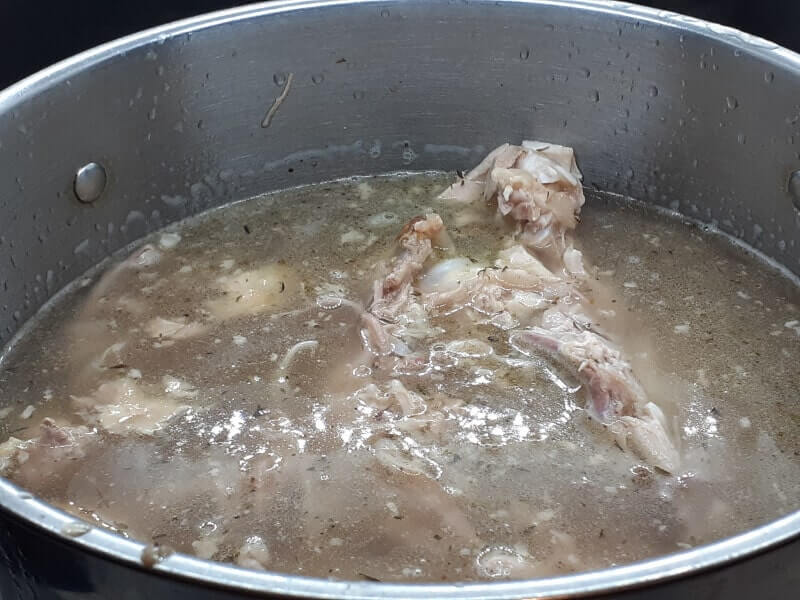
How to make Turkey Stock
This is just an absolutely brilliant way of making any stock in general from any kind of bones, trimmings and fat. The best part is that you are making the Stock and Rendered Turkey Fat at the same time. The only thing is that it takes time, in both the long simmer and refrigeration time it takes to produce both Stock & Fat. But the smell is amazing.
Using the Carcass & Skin, we can render the Fat in with the Stock, along with any trimmings. The Stock will simmer for about 4 hours at a medium heat. Then get strained, cooled in the sink and refrigerated overnight. The next day, the Fat settles at the top and can be scooped off. This serves as the Fat for making a Roux when creating the Gravy. If you end up not geting enough, the fat to make the gravy can be topped up with the Pan Drippings or Butter.
Turkey Stock
- 16 Cups of Water
- 3 Cloves Garlic
- 1 Onion
- 2 Celery
- 2 Carrots
- 1 tsp Black Peppercorn & Savory or Herb of Choice
- 1 Bay Leaf
- 1 Whole Clove
Chop the Skin into small pieces and place the Bones with any trimmings in a Stock pot with the remaining Turkey Stock ingredients. You can wait to add the Vegetables and seasoning until all the scum is scooped off.
Bring to just a Boil, lower the heat to medium and scoop off the scum for a cleaner stock. Simmer undisturbed for 4 hours or longer. If it runs too low on water, top it off. Gently strain out everything through a fine sieve. Clean the pot and place the Stock back into the pot. Place the pot in the sink and fill the sink with Cold Water to the same level of stock in the pot to cool down faster. Refrigerate overnight.

Scooping the Fat
The next day, the fat will have settled at the top. Scoop the Fat off and place into a skillet over high heat. This will boil away any stock that may have been included and leave you with pure Fat.
How to Cook Turkey Pieces
Take the Turkey out from fridge to come to room temp, while preheating the oven with the rack in middle position to 375 F. Melt about 1/3 C of Butter and dab it over the pieces with a brush before placing into the oven.
Cook the Broken down Turkey at 375 F, until the most ideal internal temperature is reached for each piece. 157 F for Breast including the Wings and 175 F or higher for Thighs. The Wings & Breast will cook the fastest and come out at the same time. With the Thighs & Legs being removed last. Allow the pieces to rest before preparing for presentation.
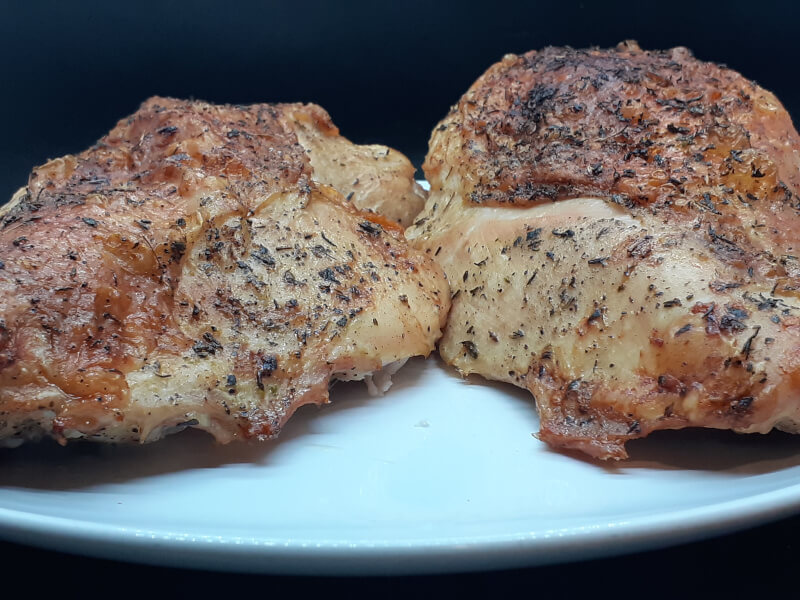
Turkey Breasts
Cooked to an internal temperature of 157 F. Wings can come out at the same time the Breasts comes out.
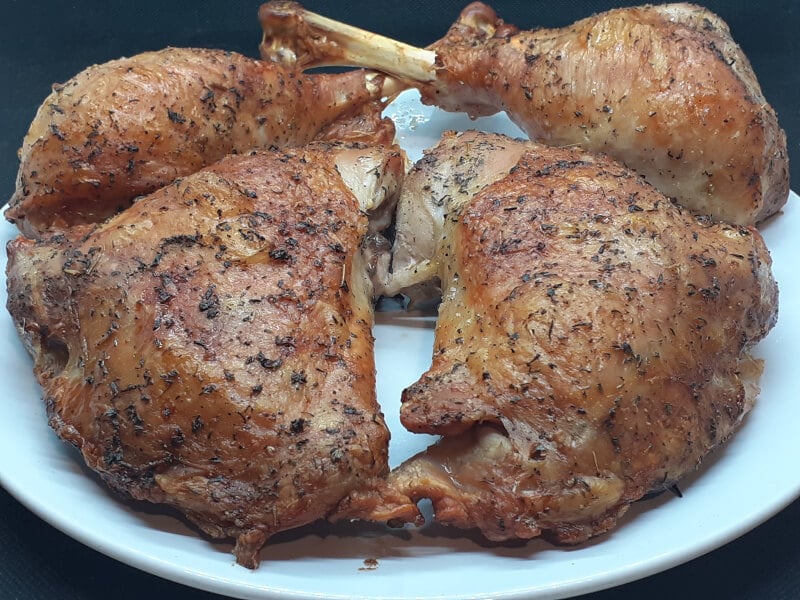
Turkey Quarters
Cooked until an internal temperature of 175 F or higher.
What is a Roux
A roux is a French term that describes combining equal parts of Fat & Flour for thickening Sauces, used here to make Gravy. The Roux is cooked over medium to medium low heat at various stages of color depending on where the roux is being used. The Roux has four (4) main stages, with the strongest thickening power at the White roux stage and less thickening power as it goes through the various stages.
- White Roux
- Used in Milk based sauces including Bechamel
- Blonde Roux
- Used in Béchamel, Mornay Sauce, Velouté, thickening a Milk or Cream Gravy or to add body to Soups, can be used for Chicken or Turkey Gravy
- Medium Brown Roux (peanut butter color)
- Used in lighter Gumbo Dishes, Brown Gravies or Sauces
- Dark Brown Roux
- Typically used in Cajun or Creole dishes for things like Gumbo, Jambalaya, can be used for Beef Gravies
How to make Turkey Gravy
Use the Turkey Fat that has been scooped off the Turkey Stock, for the fat to make the roux. Or render the Turkey Skin chopped in small pieces in a saucepan over medium to medium low heat until crisp and brown.
Bring the Turkey Stock back to a boil on the back burner until reduce until the stock is concentrated enough, that it is flavorful. Reduce the heat to low to add to the roux when ready.
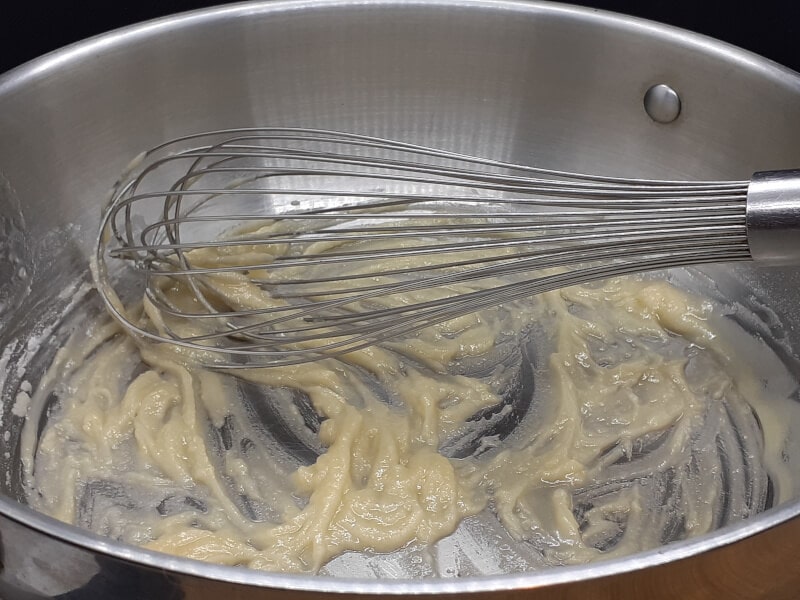
Roux
Combine equal amounts of Fat & Flour in a Sauce Pan over medium heat. About 1/3 C – 1/2 C depending on how thick or thin you want the Gravy for about 3-5 Cup of Stock. Whisk often while bringing the roux to color. The darker the Roux the darker the Gravy and flavor, but less thickening power.
In general about 2 Tbl of Fat & Flour per 1 cup of Stock.
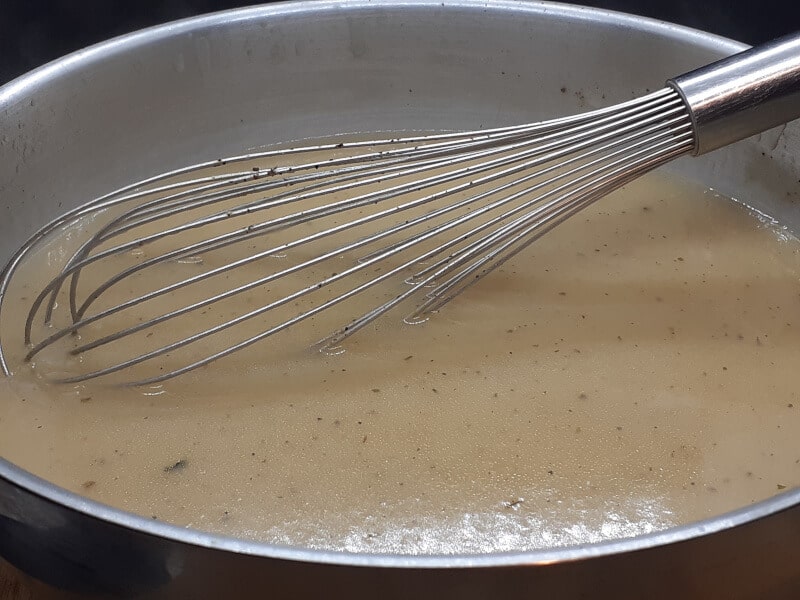
Turkey Stock
Slowly pour in small amount of Stock while whisking until thickened. Repeat adding more Stock and whisking until the desired level of thickness.
Turkey Gravy Seasoning
A go to herb like Savory or choice of Herbs like Poultry Seasoning with Salt & Pepper to taste. Onion Powder & Garlic powder are nice additions too.
A bit of acidity is very nice in the form of Cream of Tartar. In fact, the Poultry Brine, frozen into Ice Cubes can be added here to really elevate the flavors and contains Cream of Tartar. About 4 Ice Cubes is good. Or it can be prepared on the spot and 1/4 C of it used for the Turkey Gravy.

Poultry Brine
The Poultry Brine, frozen into Ice Cubes can be added here to really elevate the flavors and contains Cream of Tartar. About 4 Ice Cubes is good. Or it can be prepared on the spot and 1/4 C of it used for the Turkey Gravy.
You can also include 1-2 Tbl of White Wine Vinegar or Apple Cider Vinegar in with the Bones for the Stock. The acidity helps to extract nutrients and minerals from the bones.
Turkey Gravy Tips
There are all kinds of ways to adjust your Turkey Gravy. So even if you think you’ve messed it up, there are ways to fix it. Always season with Salt & Pepper very last to bring the Flavors out.
- Thicken the Gravy more
- Combine equal amounts of Flour & Butter and form into a paste. Add to the simmering Gravy while whisking to thicken it more. Continue to simmer for about 10 minutes to cook out the raw flour taste. You can also continue to cook the Gravy down (reduction).
- Thin the Gravy
- Add Water, Chicken Broth until the desired consistency
- Stonger taste
- Add Chicken Bouillon Cubes to strengthen the Broth
- Darker Color
- Add Dark Soy Sauce, Kitchen Bouquet, Maggi Gravy Seasoning to add a darker color to the Gravy
- Lighter Color
- Add Cream or Milk to lighten the color
- Too much Salt
- Add some potatoes chopped in half to simmer for a bit to soak up the salt. Remove and discard the Potatoes. Acidic ingredients will also tame the salt down and so will Cream.
How to prepare a Turkey Tray
After the Turkey has been cooked to the most ideal temperatures and rested. Slice the Turkey Breast across the grain with a very sharp Knife into thin slices. While keeping all the slices together, scoop with the knife and transfer the Turkey Breast Slices to the Tray. Repeat for the other breast.
Dark meat can be stripped off the bone and transferred to the Tray. You can also serve the legs whole while stripping the thigh down. Wings can be served whole too or stripped off the bone to include beside the sliced Turkey Breast.
Use the Turkey Drippings to drizzle over the meat in the presentation tray, as this adds moisture and keeps the flavor within the meat.
Holiday Turkey Tray side dishes
There are so many side dishes that can be made to serve with a Turkey Dinner. From Mashed Potatoes, Sweet Potatoes, Roasted Vegetables, Stovetop with a pinch of savory to boost the flavor to Deviled Eggs, Waxed Beans, Green Peas, Corn, Dinner Rolls and Sandwich platters. A nice addition is Jellied Cranberry sauce

Sliced Jelly Cranberry
Canned Jelliled Cranberry Sauce. Sliced and fanned out.
Leftover Turkey Recipes
Any Turkey leftovers is great for a Classic Old Fashioned Turkey Sandwich for a Snack or the Hot Turkey Sandiwch or Newfie Poutine for the follow up meal.
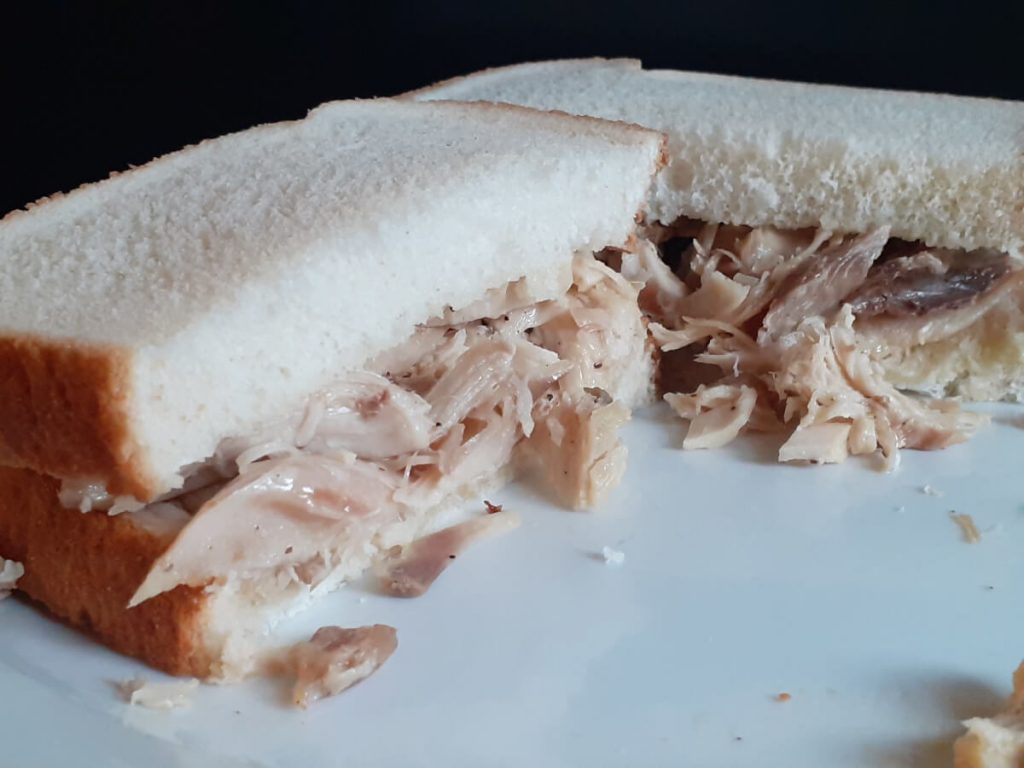
Turkey Sandwich
Reheated Turkey in a splash of Water & Butter with Salt & Pepper to taste. Served on Buttered White Bread for a Old Fashioned Turkey Sandwich.
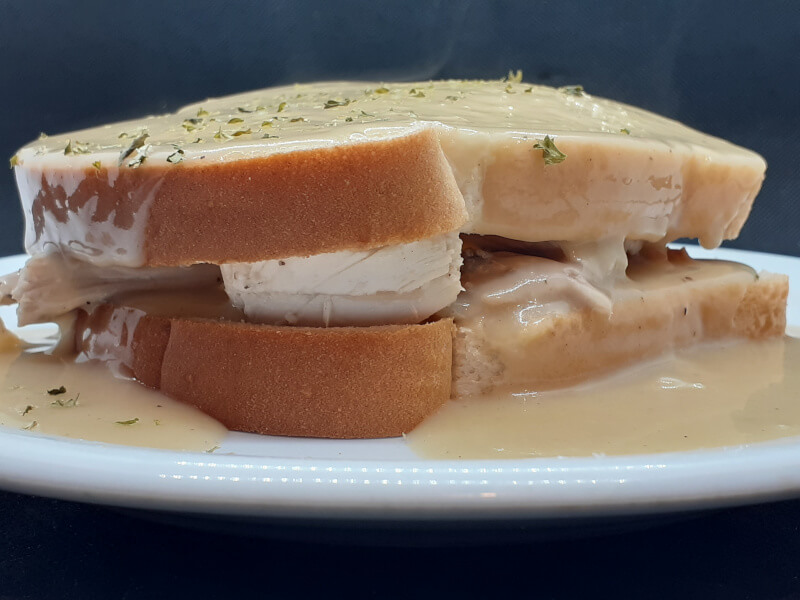
Turkey Sandwich
Mmm, a Hot Turkey Sandwich smothered in Gravy. Top it off with some Green Peas, cooked Onions or Stovetop.
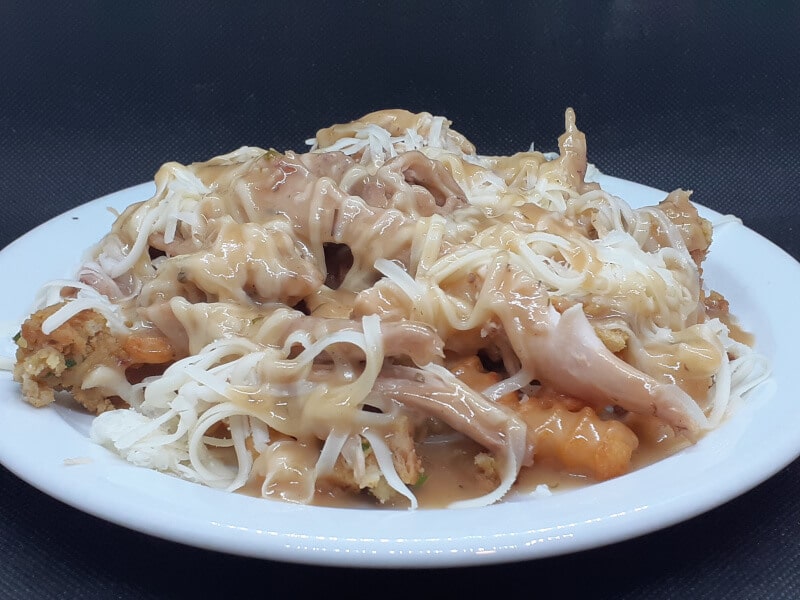
Newfie Poutine
A Newfie Poutine is an excellent way to use up any leftovers. Utilizing Turkey, Stovetop, any Vegetable side dishes like Green Peas, Corn and Gravy.
Looking for some Sahweets to serve later on in the evening or to snack on? Check out our category of Sahweets!
Don’t forget to cook the Wishbone too. Pick two people to pull it apart by their pinky. Whoever gets the bigger piece makes a wish for the New Year.

Equipment
- 1 Large Sheet Pan with Rack
- 1 Stock Pot
- 1 Sieve
- 1 Oven Safe Thermometer
Ingredients
- 12 lbs Turkey - can use smaller or larger
Turkey Seasoning
- 1 Tbl Sea Salt & Savory - each, or other choice of Herb/s.
- 1 Tbl Chicken Powder or Magic Sarap - Optional
- 1 tsp Black Pepper
- 1/2 tsp White Pepper
Turkey Stock
- Carcass, Bones, Neck Bone, Trimmings, and Skin - Chop the skin in small pieces
- 16 C Water
- 3 Cloves Garlic - crushed
- 1 Large Onion - skin on chopped in half
- 2 Carrots - snapped in half
- 2 Celery - snapped in half
- 1 tsp Black Peppercorn & Savory - each
- 1 Bay Leaf
- 1 Whole Clove
Turkey Gravy
- 1/3 C Rendered Turkey Fat - top off with Turkey Drippings or Butter if you don't have enough
- 1/3 C Flour
- 3-5 C Turkey Stock
- 1 tsp Savory
- 1/8 tsp Cream of Tartar - or use 4 ice cubes of frozen Poultry brine
- To taste Salt & Pepper
Instructions
- Break the Turkey down into each piece consisting of Wings (Drumette & Flat separated, Tips added to the stock pot), Thighs, Legs, Breast. Place backbone, trimmings and Skin chopped into small pieces into the Stock pot.
- Place the individual Turkey pieces on a wired rack within a large, shallow pan. Combine the Turkey Seasoning blend to season each piece. Refrigerate overnight, uncovered.
- Add all the remaining ingredients for the Stock into the Stock pot. Bring to just a boil, before reducing the heat to medium and scoop off the scum on the surface. Keep simmering for 4 hours or more. If you run low on water, top it off.
- Gently strain out the Stock, discarding the contents. Wash the pot and place the stock back into the pot. Place the stock pot in the sink and fill the sink up with cold water until it reaches the same level as the amount of stock in the pot. Leave until the Stock has cooled down, no longer than 1 hour. Transfer to the fridge to chill overnight once it has cooled.
- The next day, remove the Turkey from the Fridge and leave on the counter while the oven preheats to 375 F. Reposition the pieces so they are not stuck to the rack. Scoop off the fat from the Stock pot and place the fat into a saucepan over medium heat. Place the Stock on the back burner over max heat and reduce until good flavor, drop the heat to low to keep warm or remove from the heat. Continue to cook the Fat until there is no more wisp of moisture escaping the fat. Set the fat aside to cool.
- Place the Turkey in the oven with a Thermometer inserted into the thickest part of the Breast. Cook until an internal temperature of 157 F. Remove the Breast, Drumettes & Flats and let cool. Insert the Thermometer into the meatiest part of the thigh away from any bones and cook until an internal temperature of 175 F or higher. Remove and let cool.
- Melt Turkey fat over medium heat in a sauce pan. Add the Flour and whisk. Continue to whisk frequently until the roux comes to a medium brown color. Add the Turkey Stock, a little at a time, while whisking until thickened. Repeat until the gravy is the desired thickness. Add the seasoning, taste and adjust. Reduce the heat to the lowest setting until ready to serve.
- Strip the meat from the Thighs & Legs, or leave the Legs intact. Do the same for the Wings, or leave intact. Slice the Turkey Breast across the grain into thin slices with a very sharp knife. Transfer all the meat to a presentation pan and drizzle over any pan drippings over the meat. Serve the tray of Turkey at the table along with the Turkey Gravy.