

Use the PIE/413 method to get the best and consistent results when cooking homemade Pizzas in a Home Oven. This article will walk you through the best method for how to cook Pizza in a home oven. Producing a good browned skin formation, charred crust color and rise with browning spots of Cheese. It makes for a beautiful looking pizza that will have everyone thinking you ordered out.
I created the 413 method for cooking PIE at home in an oven so that I could have unmatched results with homemade pizza. It’s a superior technique, producing better results for Homemade Pizzas done in a home oven. Whether you use the Classic Hand Tossed, the Overnight Pizza Dough, this by far is the best technique, producing a pizza cook that will Make Your Belly Smile. Even if you’re cooking Calzones, Garlic Fingers, or Twisty Bread. This method will produce the best results every time.
How to Cook pizza in an oven
The best method for cooking pizza in the oven, is what I call the 413 (PIE) method. It uses a Pizza Screen & Pizza Stone. I use this method now for everything pizza related. Whether that be Pizzas, Calzones, Twisty Breads, Garlic Fingers or Donair Pizzas. It’s this method that produces the best results.
Pizza Cookware
To start, you need a Pizza Stone and a Pizza Screen or Pan. It’s these two cookwares that will assist in cooking up your pizzas perfectly.


Home Oven Setup for Pizza
To get the best possible cook on your homemade pizzas. Set up the oven with one rack at the lowest position and place a pizza stone on that bottom rack. Then place the other rack in the middle position and preheat to the highest setting your oven will go, for at least 1 hour. During preheating, place your dough tray on the counter to come to room temp, if previously refrigerated.

413 Pizza Cook Method
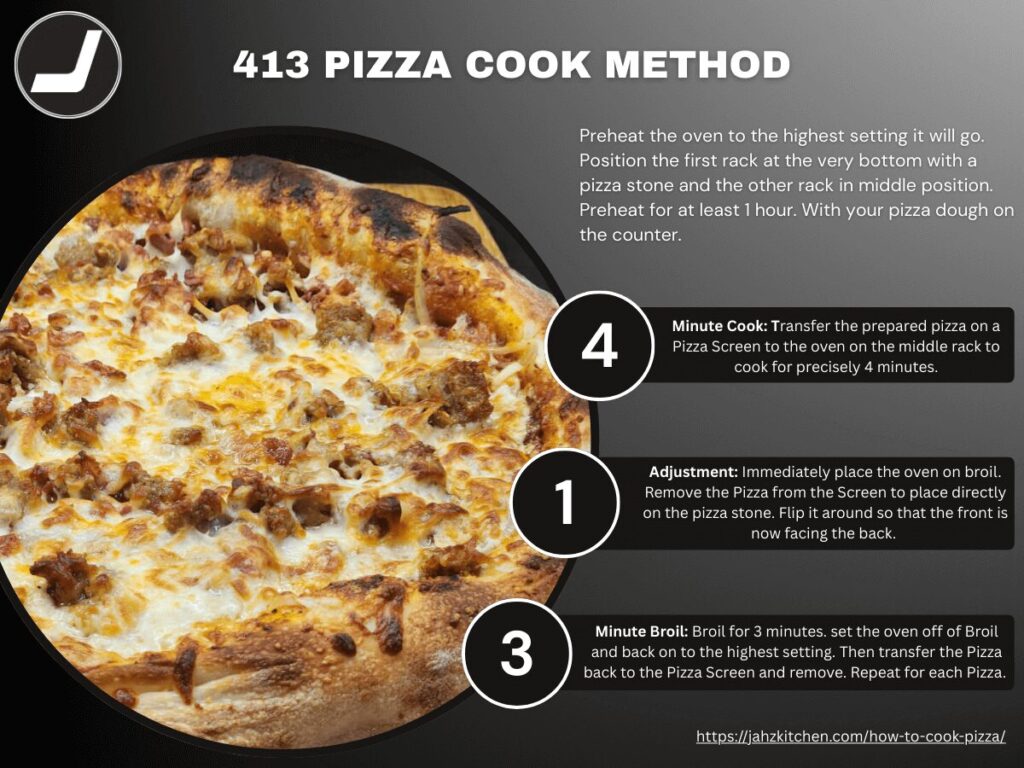
With the PIE/413 Pizza Oven setup done and preheating, the actual cooking of the Pizzas follows the 413 Pizza rule or technique.
- 4 Minute Cook: Prepare the close to or at room temperature Pizza Dough and place it on a Pizza Pan or Screen and build the Pizza. Place into the oven on the middle rack to cook for percisely 4 minutes.
- 1 Adjustment: With 3 minutes of cooking time remaining, immediately place the oven on broil. Then flip the Pizza around so the back is now facing the front and remove it from the Pan to make direct contact with the Pizza Stone on the bottom rack. This will Crust up the bottom and form a nice skin.
- 3 Minute Broil: Let it Broil for 3 minutes. This is where the topside browning occurs. When you remove the Pizza, immediately place the oven off the broil setting and back on the highest setting. Repeat the 413 Pizza technique for each Pizza.
In the event you catch the oven at its lowest heat, which can sometimes happen. You will see that the pizza doesn’t brown as much. In this case, after the initial 7 minute cook time. Place the oven off of broil and back to the highest heat position. Transfer the Pizza back on the screen and move to the middle rack position to cook until browned to your liking.
Why the 413 Pizza Method is best
- Sets the Pizza: The initial cook time sets the pizza, so that it is sturdy enough to handle. Making it easy to take off of the pizza screen or pan to come in direct contact with the pizza stone later on.
- Skin Formation: Because the Pizza is first set, so that it is more sturdy. It easily transfers to the bottom rack and on the pizza stone to really get a good cooked through skin on the bottom. The Pizza stone retains heat very effectively and when the pizza comes into direct contact, the heat transfers and form a good skin that is browned very well.
- Browning: The last stage is broiling and this causes the crust of the pizza to cook through at a higher direct downward heat. Which not only produces a nice browned crust. But beautiful brown spots throughout the Cheese, that you would associate with a perfectly cooked pizza. Since the pizza is furthest away from the broiler element, it’s not too aggressive, causing the Cheese to split or even worse the pizza sauce to bubble up and through.
Oven Temperature control
- Temp Control: Ovens have a lag in response to the oven temp and with pizza you really need the heat to be on point. This method works exceptionaly well at triggering the heating elements to come on faster, because of that one adjustment after the initial 4 minute cook.
- Turning on the oven to broil and opening the door does a few things.
- It activates the broiler element for a faster rise in heat.
- Opening the door allows the hot air to come out and drops the heat fast. Which in turn triggers the heating elements, no lag or waiting for the stove to register the heat drop. You are causing the heat drop and timing is crucial here.
- With the Pizza set on the Pizza stone directly. The bottom browns and crust up from the residual heat from the pizza stone. Even more effective, because it’s so close to the heat source. While at the same time getting heat from above, just the same as a Pizzeria oven. The broiling takes about a minute to really get hot. After that, it’s a steady flow of heat right over the top your pizza. Browning the Crust and melting the Cheese to perfection.
- Turning on the oven to broil and opening the door does a few things.
- Timing: Pizza has to be cooked at a really high heat and for a very short time. If you excessively cook a pizza too much, you loose out on the crispy, but still soft and chewy texture of the pizza. You can burn a pizza, that’s fine, since the time is very short, and is even desirable. But cooking too long is no good for pizza. This method accomodates the best you can get with a home oven in both pumping heat out and the time it takes to cook the pizza.
Best way to cook pizza in an home oven
The real trick to this all is you need that broiler to pump heat into the oven fast in a downward direction just the same as a pizza dome funnels air downwards with the pizza sitting at the base or bottom. This by far produces the best browning and in the shortest amount of time which is very much desired for pizza in order to achieve a soft but crisp crust.
The first cook, heats and expands the pizza dough. Then when the Pizza is turned around and placed directly on the Pizza stone, it cooks evenly and comes into direct contact with the Hot Stone, which will crisp up the bottom. Then when the Oven is placed on broil. It pushes the heat down into the crust. It creates the most efficient browning of the Pizza in the shortest time possible to yield a soft but crispy crust with good browning.
Pizza Dough
The very first variable in how well a pizza comes out is the dough itself and there are a few factors that affect how well the Pizza cooks.

How Does Pizza brown
Besides a High Heat, both Oil & Sugar promote browning of the Pizza Dough. If a Pizza Dough does not have enough Oil or Sugar it will cook up lighter than a dough that does with the confinements of same heat, same duration. You can cook it longer, but now you risk drying the pizza out and getting a hard crust instead of a crispy soft, light and chewy crust.
Brushing Oil, Aioli or Garlic Butter on the Crust will also promote browning.
Pizza Dough Hydration
The hydration of a pizza dough will affect the texture and is in direct relation to how long a Pizza can be cooked for. High Moisture doughs can be cooked longer. While low hydration doughs need to cook up faster.
Take a look at the Neapolitan dough which does not have Oil or Sugar in it. While in restaurants it comes out with dark spots on it, caused by the extremely high heat. At home this is impossible to reach. Often with a homemade Neapolitan Pizza dough the hydration needs to be higher. This in turn allows you to cook the Pizza longer before you are at the edge of it drying out too much.
With the Classic Hand Tossed Dough or the Overnight Pizza Dough, this is further aided with the use of both Oil & Sugar in the dough. But with a Neapolitan Pizza dough, there is no Sugar or Oil. A Neapolitan Pizza will cook for 60 – 90 seconds in a Pizzeria oven, at home 7 minutes. Although with the PIE/413 method, a homemade Neapolitan Pizza will come out much better than any other cook method.
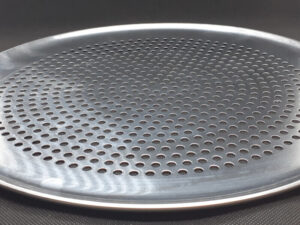
Pizza Screen
Pizza Screen or Pans are used to Place the Dough on and build the Pizza and then be able to transfer to the oven without a Pizza Peel and distorting the circular shape. There are a few different Pizza Screens/Pans.

Pizza Screen
A Pizza Screen is a circular wired mesh that allows for optimal heat transfer.

Pizza Pan
Pizza Pan is the older style circular thin metal pan that is ideal for pressed pizza. This is where the tray is oiled and the dough is pressed out and stretched to fill the tray. This method creates little dimples in the dough that can hold an extra bit of sauce and creates a dimpled bottom where the dough takes on different texture.

Perforated Pizza Pan
This is halfway between a Screen & Pan. It is most often used for Neapolitan style Pizzas.
This is also useful for making a 10, 12 and 14 inch pizza by placing the dough on and aligning it. A 14 inch goes all the way to the edge, a 12 inch just pass the last ring and a 10 inch before the last 2 rings.
Pizza Stone
A Pizza Stone can greatly improve your pizzas and really is a must if you want a good crisp bottom. Some believe that a pizza pan takes its place, but this is simply not true. The main reason for a Pizza Stone is to have a solid base that will maintain heat even through and during the fluctuations of the oven temperatures.
You need the stone to apply that heat directly to the underside of the pizza to form a good skin and brown it sufficiently. A Pizza Pan or screen simply will not do this. It conduct heat really well and that’s good, but you need a pizza stone for a good skin formation and browning.
Initially you want the pizza on a screen or pan and bake it just like that. The pizza will have cooked enough so that it’s easily transferred off the screen or pan and directly to the Pizza Stone.

Pizza Stone
A Pizza Stone will retain the heat much more sufficiently than your stove. When ready to crisp the bottom of your pizza, it will be placed in direct contact with the Pizza Stone in order to brown and crisp up the bottom. It doesn’t need long, only about 3 minutes.
Pizza Oven Rack Position
The best rack position is the bottom rack with a pizza stone using the 413 technique. At the lowest rack position, the Pizza Stone stays close to the heat source allowing it to reach much hotter temps and the Pizza is able to cook furthest away from the Broiler for optimal heat flow and efficient browning.
The Pizza is placed on a Screen or Pan and cooked for 4 minutes in the middle rack posiiton. With only 1 adjustment, where the oven is placed on broil and the Pizza is turned around. So that the back of the pizza is now facing the front and removed from the pan to make direct contact with the Pizza stone, on the bottom rack, before being broiled for 3 minutes.
Pizza Oven temperature
The Pizza oven temperature for a home oven, needs both the highest setting it will go and preheated for quite some time, and set to broil for the last 3 minutes.
Pizza needs to cook at a very high heat in a short time in order to brown and minimize on water loss. At home you will want your oven set to the highest setting it will go for at least 1 hour. But even this isn’t really hot enough. Using the 413 technique creates the hottest stove, ideal for cooking Pizzas. The pizza is broiled last for 3 minutes, which is just pushing it. It creates a nice crust with the cheese melted and brown spots throughout the cheese.
How long to Cook Pizza in the stove
Pizza needs to be cooked as quick as possible and the PIE/413 method, cooks it in 7 minutes. Because we are using a home oven. It’s how that heat is regulated and how we cook the pizza, with the help of a Pizza Screen & Stone that allows us to get absolutely the best results. So much so, that everyone may mistaken it for a pizza that was ordered out.
Pizzas
Beautifully cooked Homemade Pizzas are cooked using the 413 Pizza technique.


Calzones
Calzones are cooked the exact same way as Pizzas, using the 413 Pizza technique.

Garlic Fingers
Garlic Fingers are cooked just the same as Pizzas, using the 413 Pizza Cook Method.

Twisty Bread
Twisty Breads do not need to have a stone in place and are cooked the whole duration (7 minutes) with just the oven at the highest setting, no broiling and no transferring to the bottom rack. Cook for 4 minutes in the middle rack position. Make 1 adjustment by flipping the bread sticks over with tongs. Cook a final 3 minutes before removing from the oven.


Equipment
- 1 Pizza Stone
- 1 Pizza Screen
Ingredients
Instructions
- Position the oven rack in middle position and the other rack in bottom position, with a pizza stone in place on the bottom rack. Preheat the oven to the highest setting it will go, usually 500 F to 550 F. Let it preheat for 1 hour.
- 4 Minute Cook: Prepare the Pizza Dough and transfer to a Pizza Screen or Pan. Assemble the Pizza and transfer to the oven to cook for precisely 4 minutes in the middle rack position.
- 1 Adjustment: At the 4-minute mark (3 minutes of cook time remaining), immediately place the oven on broil. Remove the Pizza from the Screen or Pan to come in direct contact with the pizza stone on the bottom rack position. Flip it around so that the front is now facing the back.
- 3 Minute Broil: Broil for 3 minutes. Immediately take the oven off of Broil and back on to the highest setting. Then transfer the Pizza back to the Pizza Screen or Pan and remove. Slice the pizza and set aside or serve. Repeat for each Pizza.
- In the event that you catch the oven at its lowest heat, which can happen from time to time (you will find the pizza doesn't brown as much). Set the oven off of broil and back to the highest oven temp. Transfer the Pizza back to the Pizza screen and place in the middle rack position until browned to your liking, about another minute or so.